Wednesday, August 29, 2012

Duct Tape Storage Boxes


So, I will be the first person to admit that I am very picky and can tend to be a perfectionist.

We are not having a nursery for our baby boy just yet since we are not sure when we will be moving again(should be in the next couple of months), but we did want to give him his own little area in our house.

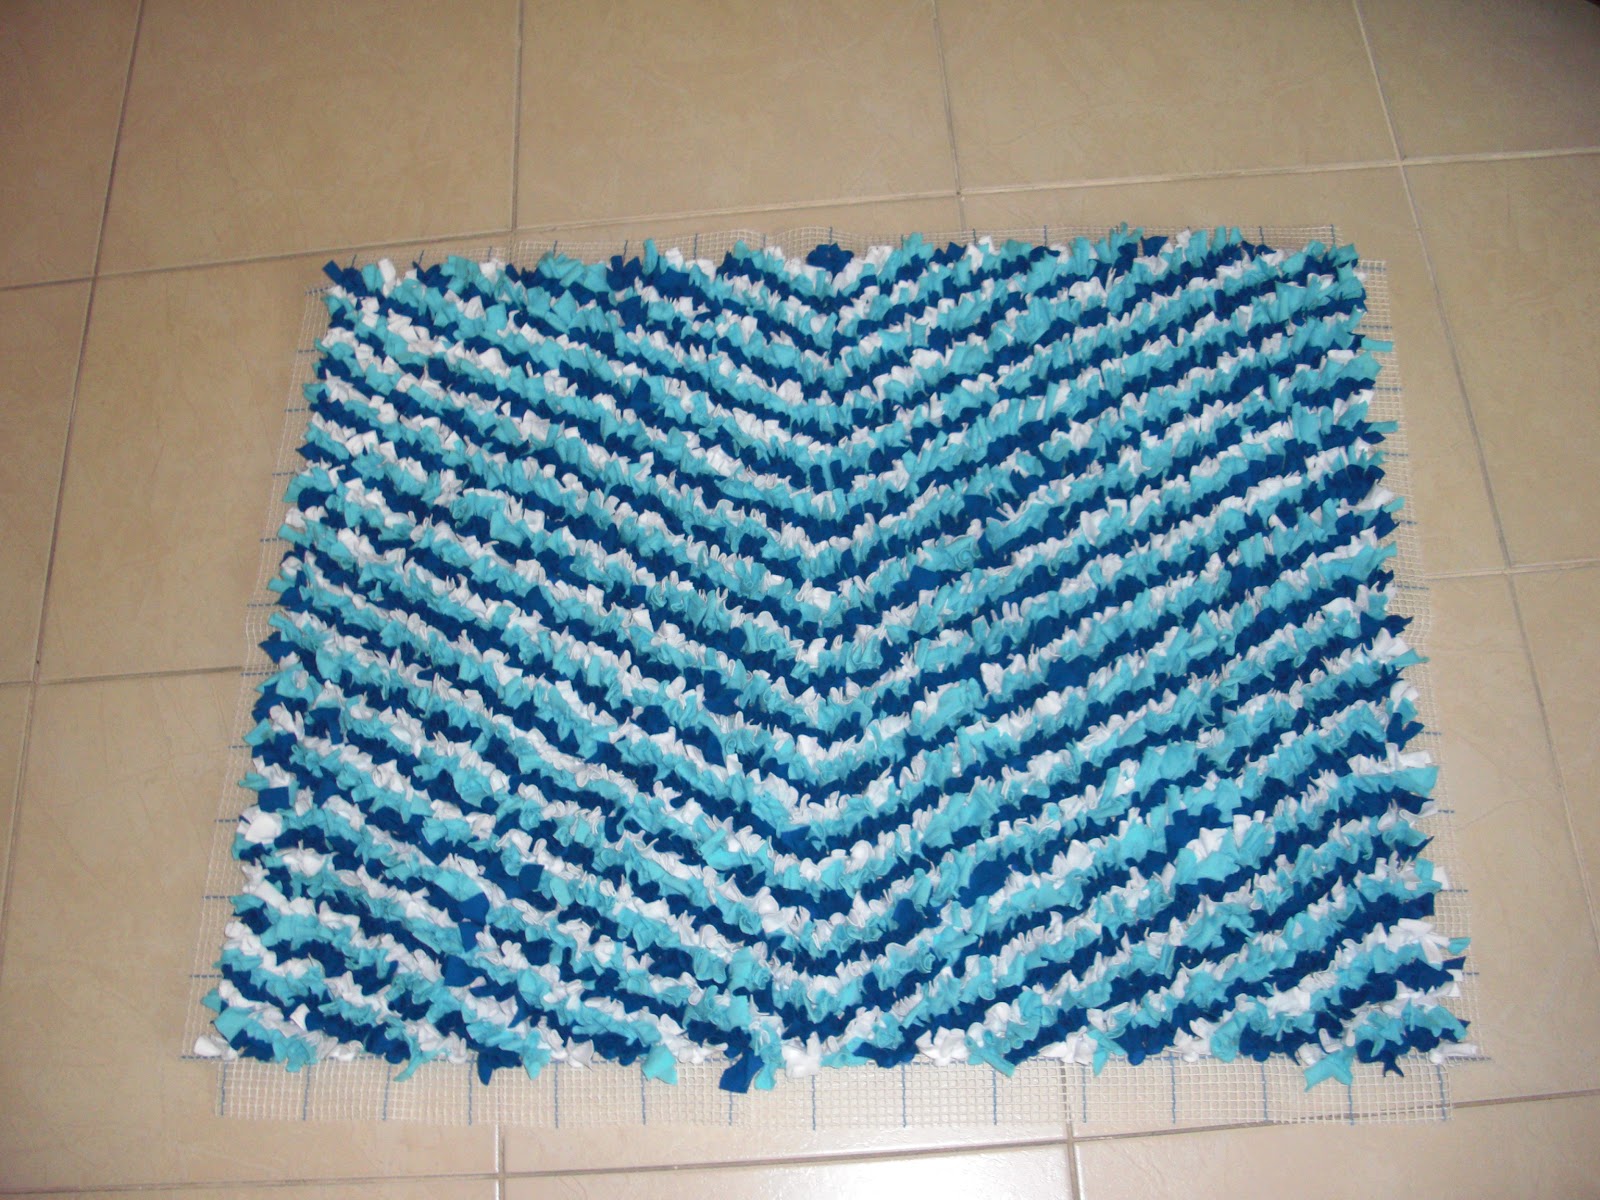
I wanted to find linen storage bins that matched the rug I made here:
http://danielleoxley.blogspot.com/2012/08/jersey-knit-rug-part-2.html
but I was unable to find any that matched the colors exactly how I wanted them to. I then decided that I would just use cardboard boxes to hold books and toys in until I could find something that I actually liked.

One of my friends pinned a tutorial on how to make cardboard boxes look cooler with duct tape and I knew that was my solution to my problem.

While I probably could have saved a couple cents by just buying cheap storage bins and dealing with the colors not matching exactly, I am super satisfied with how this project turned out.


Duct Tape Covered Storage Boxes

Materials Needed:

*Cardboard Box (I used diaper boxes since we have plenty of those around)
*Colored or Patterned Duct Tape (Depending on the size of your box, you may need a lot or a little of this. I used three different colors and for two boxes, did not even go through 2 rolls of each color duct tape.)
*Scissors
*Vinyl Letters to finish off the project (If you wish. These are not necessary though.)

 
Instructions:

1. Cut off the top flaps of the box, if you wish. The tutorial I am basing this on did not cut off the flaps, but I wanted the boxes to be flat on all edges, so I cut the flaps off.

2. Begin to cover the box with the duct tape. I have read some tutorials on line where they tell you to just continuously wrap the duct tape around the box, but I was afraid this would cause too many inconsistencies so I covered each side individually. I began with the bottom of the box, then moved to the inside of the box(which is not necessary to tape if you don’t want to) and then finished up the outside. I knew that I would be covering the corners of the box in the darker blue tape that I was using so I cut the strips so that there was a little bit of overlap around the corners and edges.
 
3. Finish up the box with some vinyl letters, if you wish. My great friend, Ashley offered to send me these and I was so glad that she did because I really feel like it makes the box look so much better than without the letters!

Here are the pictures of both the toy box and the book box now that they are complete!

Jersey Knit Rug (Part 2)


So, a while back, I posted part one of my jersey knit rug blog. If you want to look at the original blog post, here is the link: http://danielleoxley.blogspot.com/2012/07/latch-hook-rug-part-1.html

Well, I actually thought that it would take me a lot longer to finish up the rug than it did. I guess I have gone into nesting mode lately and have wanted to get a bunch of projects done now that we are less than 10 weeks from our baby boy coming into this world.

I finished this project a couple weeks ago and decided it was time to share the part 2 of my project for those of you who may have decided to make this rug yourself.

Jersey Knit Rug (Part 2)

The materials you should have left are:

*Your latch hook canvas filled in with all of the fabric that you are using.
*Rug binding (I am using iron-on binding for this, but there is also binding that you sew on. Depending on what type of binding you are using, you will either need a very thick needle and thread or you will need an iron and ironing board.)
*Scissors

Now let’s start finishing up this rug!

1. Cut the edges of the rug so that it is easier to deal with. I wound up originally cutting the edges of the rug so there was a whole square of latch hook canvas left around the rug, but then decided that it would be easier if I cut the fabric to be even smaller. Here is a picture of my rug when the latch hook canvas was finally cut to the size that I wanted to work with.


NOTE: I found it easy to decide what size I needed to cut the canvas down to by pulling out the rug binding and using it to measure.

2. Fold the extra latch hook canvas material to the back of the rug. I thought this part of the project would be very difficult since the material is so stiff, but found it to be very easy once I got going. I folded the fabric one small square off of the area that I had already placed fabric. I found this was best because it did not cause the jersey knit fabric to fold over to the back of the rug with the rug binding.

3. Take care of the corners of the latch hook canvas that you have folded back. You can either leave the corners overlapping as they will be when you fold the extra hatch hook canvas to the back of the rug or you can cut the corners to help keep the corners from being thicker than the rest of the edges. I decided to cut the corners so that there was only two pieces of fabric overlapping instead of the four pieces that originally were overlapping. 

4. Cut the rug binding so that it is the length that you need it to be. I had originally decided that when I am ironing the rug binding on, I will cut the corners at an angle so that there is not a large overlap of the binding. This is not what happened when I actually started working on it and there is an overlap of my binding, but it does not cause any bulges to the rug.  NOTE: I originally thought the rug binding had a sticky adhesive to the back and that I would be able to place the rug binding on before moving the rug to the ironing board. This is not the case, but the rug binding is very light and pretty easy to place on the rug when it is already on the ironing board (or the floor, which is where I ironed on the binding for my rug.)

5. Attach the rug binding to rug. I do not have instructions for this if you are using the sew-on binding, but I am sure they are easy to find if you use Google. I am also sure that the package of binding will have plenty of directions to help you out as well. As for the iron-on binding, you will use the iron set on the wool setting. Place the binding where you want it ironed and press down with the iron for about 7-10 seconds. You will need to check the tackiness of the binding after holding the iron there for this amount of time and you may need to hold the iron there a little longer. Here is a picture of the back of the rug when the binding has been attached.


Here is a picture of the rug now that it is all done. I am sure our son will love laying here for tummy time and we will get some great pictures of him on this rug when he finally graces us with his presence.


Tuesday, August 14, 2012

Nutella French Toast Sandwiches


I know I posted before that my husband loves macaroni and cheese. He also loves French Toast and lately has been addicted to Nutella.

When I say addicted to Nutella, I mean that when I made Nutella truffles, he was very excited and every time we go to the movies, he gets a Nutella, strawberry, and banana crepe. Yes, we get crepes when we go to the movies here. Definitely something I will miss when we get back to the States.

I found this recipe a while ago and was very excited to make it for my husband.

Here is the link to the original blog post that I used for this: http://www.navywifecook.com/2012/02/nutella-french-toast-with-strawberries.html

I changed a lot for my version of this, so I recommend checking out the original blog as well.
Sorry for no pictures. I promise to get better about that one of these days. :)

Nutella French Toast Sandwiches

Ingredients:
*A loaf of bread (The more stale the bread is, the better your French toast will hold up.)
*4 beaten eggs
*1 cup milk
*2 tablespoons sugar
*2 teaspoons vanilla extract
*2 teaspoons orange liqueur (I use Jose Cuervo Orange Tequila in mine)
*Cinnamon
*Butter
*Nutella

Directions:
1. In a shallow bowl or pie pan, beat together eggs, milk, sugar, vanilla, orange liqueur and cinnamon.
2. Scoop some butter onto a skillet or a griddle that is heated up so that the butter melts. (I use a griddle because it makes it easier and quicker for me to get breakfast done. If I was using a skillet, I would have to cook the French toast slices one at a time, but with a griddle, I can get six slices done at once.)
3. Dip the slices you have room for on your cooking surface into the egg mixture. Make sure to coat both sides of the bread.
4. Cook the slices of bread until both sides are golden brown and the egg mixture is completely cooked.
5. As soon as you remove the French toast from the skillet or griddle, pair up the pieces of bread. This will help you out when making your sandwiches.
6. Start the rest of your bread on the skillet or griddle, if you still have more bread.
7. Take your pairs of pieces of bread and spread Nutella on one of them. Then, place the other slice of French toast on top to make a sandwich.
8. Enjoy!

What Did I Think of This Recipe:

This is a great recipe that my husband has fallen in love with. I actually don’t know why I never thought of adding Nutella to French toast before finding this, but it is a good thing that I found this.

I used a completely different method as far as this recipe goes than the original blog did. That is mainly because I don’t like to dip sandwiches in the egg mixture. It just never seems to cook well enough for me and this way, you get more of the French toast flavor!

You can garnish this with strawberries or any other kind of fruit if you would like. I was going to do a mixture of strawberries and bananas on the side of this, but all of the produce I have been finding lately has been pretty gross looking so I decided to just make the French toast sandwiches.

This is definitely a recipe that we will be keeping around. My husband is obsessed with Nutella as it is so he was very happy for me to find a way to combine both Nutella and French toast!

Crockpot Beer Chicken


First of all, I apologize for the break in blog posts again. I will be making up for it by posting quite a few blogs of things that I have done in the past couple of weeks.

Second, I apologize for no pictures. I literally keep thinking about taking pictures after we have already ate the meal and I don’t think that looking at an empty plate is going to help you all out too much. J

I was browsing Pinterest one day for crockpot meals and came across this recipe, which I instantly knew I needed to try.

I am going to preface this by saying that I only like certain beers and right now there is no drinking of beer going on for me due to pregnancy. While I was home on vacation, though, my husband went to a beer tasting on base and came home with a different beer that I had never heard of. He has had a couple since then, but there have been two bottles sitting on the counter starting me in the face since I returned and this was one way of getting rid of at least one of those bottles.

Normally, I would make beer biscuits with an extra bottle or can of beer, but since my oven doesn’t bake that just isn’t possible so this recipe became a good solution to that.

Here is the link to the original recipe: http://www.mydailydish.com/2010/01/beer-crockpot-chicken.html

There is not really much to this recipe so feel free to use the other blog post if you must, but most things are exactly the same on this post as well.

Crockpot Beer Chicken

Ingredients:
1 Bottle or Can of any kind of Beer
2 chicken breasts
Garlic Powder
Italian Seasoning
Black Pepper
Salt

You will see that I do not put measurements of spices on my recipes and that is because I don’t measure. Feel free to sprinkle on as much or as a little seasoning as you like.

NOTE: According to the original blog, you can use whatever spices you would like and I have to agree that I thought about using different spices as well.

Directions:
1. Put all ingredients into crockpot.
2. Cover crockpot and cook chicken. (If chicken is frozen, cook on high for 4-5 hours or on low for 8-10 hours. If chicken is fresh, cook on high for 3-4 hours or on low for 7-8 hours)
3. Enjoy.

What did I think of this recipe?

This is a very easy recipe. Literally, there is nothing to it.

This is also a great way to use up a bottle or a can of beer if you do not have any use for it or if it is starting to go bad. (Yes, beer can go bad if it sits for too long.)

The whole house will smell like beer. I feel like you deserve that as a warning.

The chicken came out tasting like seasoned chicken. I did not get much of the beer taste in the chicken, which I was very glad for. I think that you could use this recipe to cook a whole chicken and have leftovers that you can use for different recipes throughout the week.

I will definitely keep this recipe around although I do not think that I will go out of my way to make this recipe again. My husband and I both really enjoyed the chicken, but this wasn’t one of those recipes that you just know you have to make again.

Tuesday, August 7, 2012

Crock Pot BBQ Chicken


I know, I know, it’s been a couple days since I posted. And the truth is that I made this meal last week. It has been a crazy weekend trying to get everything done so that we can relax before the baby gets here.

Here is the original website for this recipe: http://forkinit.blogspot.com/2010/09/crockpot-barbecue-chicken.html

It is a pretty self-explanatory recipe and the steps are really easy. It turned out great.

Sorry for no pictures, but the original blog website has a couple of pictures if you really need the pictures to know if this is a good recipe or not.

Crock Pot BBQ Chicken

Ingredients:

*2 boneless skinless chicken breasts, frozen (I only used 2 because there is only 2 of us, but you could use as many as you need.)
*1 bottle BBQ sauce
*1/4 cup vinegar
*Red pepper flakes
*1/4 cup brown sugar
*Garlic powder
*Onion powder


Directions:

1. In a bowl mix BBQ sauce with vinegar, red pepper flakes, brown sugar, garlic powder and onion powder. (I don’t measure my spices so I don’t have an exact measurement of how much garlic powder, onion powder, or red pepper flakes I used.)
2. Place chicken in the crock pot.
3. Pour sauce over chicken inside the crock pot.
4. Cover crock pot and turn on low for 4-6 hours.
5. Enjoy!

What did I think about this recipe?

As I said above, this is a really simple recipe. I actually do this same thing with ribs all the time, but had never done it with chicken.

The chicken will fall apart if you put too much pressure on it. My husband and I both cut into the chicken to see if it was done all the way through and wound up cutting our chicken in half.

I really like red pepper so next time I may add a bit more than I did this time. You could pretty much add whatever seasonings you want to this though as it is a pretty foolproof recipe.

I used to make chicken like this all the time in the oven back in San Diego, but with our oven here, that is just not an option so this is a great alternative to that.

This recipe will be added to our frequently made list since as we were eating it, my husband asked me why everything tastes better from a crock pot.

The biggest thing I figured out is that I really need 2 crock pots so that I can cook both my main dish and my side at the same time. I was thinking this would be the perfect side: http://danielleoxley.blogspot.com/2012/07/ok-so-anyone-who-knows-my-husband.html

Wednesday, August 1, 2012

July Project Recap


So I decided to start off every month with a recap of all the blogs that I did last month. I figure this will be a great way to keep everything in order.
This also gives me a day to recover and find other projects to post up on here since I do not tend to do new projects every day, even though my blog may seem like I do sometimes.

July Recap

Recipes:

*Italian Grilled Cheese (Not one of my favorite recipes, but worth sharing in case you are interested in it.)
http://danielleoxley.blogspot.com/2012/07/italian-grilled-cheese-sandwich.html

*Crock Pot Macaroni and Cheese (Definitely a new favorite in my house!)
http://danielleoxley.blogspot.com/2012/07/ok-so-anyone-who-knows-my-husband.html

*Crock Pot Brunch Casserole (This as good, but I think the next time I make it, I will make some changes.)
http://danielleoxley.blogspot.com/2012/07/crock-pot-breakfast-casserole.html

*Crock Pot Chicken Tacos (Another new favorite in my house. My husband is already asking me to make it again.)
http://danielleoxley.blogspot.com/2012/07/crock-pot-chicken-tacos.html

*Chicken Tortilla Soup (Next time, I need to invite people over to eat with me or plan on freezing a bunch of this.)
http://danielleoxley.blogspot.com/2012/07/chicken-tortilla-soup-with-leftovers.html

Chickpea and Tomato Salad (A great, quick, inexpensive snack to keep around for the afternoons.)
http://danielleoxley.blogspot.com/2012/07/chickpea-and-tomato-salad.html

Craft Projects:

*Jersey Knit Rug Part 1 (The next part of this project will be posted in the next couple of days.)
http://danielleoxley.blogspot.com/2012/07/latch-hook-rug-part-1.html

*Button Tree Canvas (Really cute and simple project!)
http://danielleoxley.blogspot.com/2012/07/button-tree-canvas.html

*Fleece Tie Blankets (Really cute and simple project that I have been doing for years.)
http://danielleoxley.blogspot.com/2012/07/fleece-tie-baby-blankets.html

Monogrammed Candle Jar (A project that literally cost me next to nothing.)
http://danielleoxley.blogspot.com/2012/07/so-while-back-i-had-posted-blogabout.html

*Contact Paper Stencils (A little mini blog in order to help with monogrammed candle jar project.)
http://danielleoxley.blogspot.com/2012/07/contact-paper-stencils.html

Crock Pot Lasagna


There are so many recipes that used to be my go-to meal recipes when we lived in San Diego. Lasagna was one of them.
When we moved into our flat here in Bahrain, I quickly learned that there were meals that I would not be able to cook in the oven, due to it being a top heating oven only. Lasagna was again one of them.
When I came across this recipe on Pinterest, I instantly knew I had to try it since lasagna was one of my husband’s favorite meals in San Diego.
Here is the link to the original recipe: http://www.sixsistersstuff.com/2011/02/slow-cooker-lasagna.html
I tried to stick to the recipe as much as possible since it is my first time attempting lasagna in the crock pot! J

Crock Pot Lasagna:
Ingredients
*1 lb. ground beef
*1 (24 oz) jar spaghetti sauce
*1 cup water
*15 oz container of ricotta cheese
*1 package of Italian Cheese Mix (about 2 cups)
*1/4 cup grated Parmesan cheese (I used a Parmesan and Romano mix)
*1 egg
*2 tablespoons Italian Seasoning (I didn’t actually measure this out just sprinkled it in.)
*Lasagna noodles, uncooked.

Directions:

1. Brown meat in large skillet, stir in spaghetti sauce and water. (You can drain the meat mixture if you want, but I never drain the meat mixture so I decided not to start with this recipe.)
2. Mix ricotta, 1 ½ cups of Italian Cheese Mix, 2 tablespoons (or however much you sprinkle in) of Parsley, Parmesan cheese, and egg in a bowl.
3. Spoon 1 cup of meat sauce into the crock pot, top with lasagna noodles, broken to fit; and half of the cheese mixture.
4. Spoon 2 cups of meat sauce into the crock pot, top with more lasagna noodles, broken to fit; and the other half of the cheese mixture. Top with remaining meat sauce.
5. Cover the crock pot with the lid and cook on low for 4-6 hours, or until the liquid is absorbed.
6. Sprinkle with remaining Italian Cheese Mix and let lasagna stand, covered, for about 10 minutes, or until the cheese has melted.
(Sorry, I didn’t get a picture of the lasagna when it came out of the crock pot. The original recipe page has a picture of their lasagna. You would have a hard time getting a picture too when you are that hungry and the meal smells that good! J)

What did I think of this recipe?

We originally served the lasagna after only letting it sit until the cheese had melted. It was a little too soupy for me. We both had seconds of this meal so when we went back to get our second serving, the lasagna was a bit more like a lasagna that you would bake in an oven.
This was fantastic tasting lasagna. Yes, it dirties up about the same amount of dishes as a normal lasagna would, but when you are working with an oven that only heats from the top, you are a bit limited in what you can put in the oven!
I think that adding a few more, different kinds of cheese would be great for this recipe. I am thinking that the next time that I make this, I will add provolone slices on top of the ricotta cheese mixture.
It can be difficult to spread the ricotta cheese mixture around. When it touches the sauce, it will be completely useless as far as spreading it around goes. What I am trying to say is make sure you have enough noodles in the crock pot so that the sauce is mostly covered up!
Be prepared to make a little bit of a mess. When I was putting the sauce into the crock pot, I got sauce all over the stove. Luckily, I had thought about this problem before hand so I was not upset.
This recipe will definitely be added to our frequently cooked meals.